

This plugin allows images to be transferred from Collection Pro to a WordPress CMS. Once transferred, the images appear in the WordPress media gallery and can be used as usual.
WordPress version 4.7 or higher is required.
Installation & Configuration
To use the plugin, it must be installed, activated, and configured.
In version 6.16, for example, the WordPress plugin is already included under the name easydb-wordpress-plugin.
However, you still need to activate and license it manually.
1. Activation
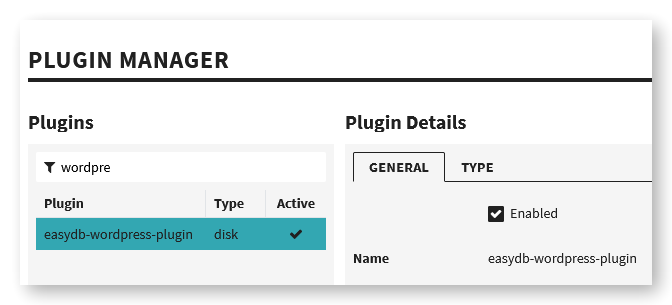
You need to activate the plugin in the Plugin Manager, as shown in the screenshot below.
Don’t forget to click the “Save” button in the lower-right corner to apply the changes.
2. Configuration
After the plugin has been successfully installed, navigate to the Base Configuration and locate easydb-wordpress-plugin. Here, you can add and connect one or more WordPress installations.
For each WordPress installation, you need to configure the following fields:
| Field | Description |
|---|---|
| Instance Name | A name for the WordPress installation. This will be displayed in Collection Pro when selecting the export target. |
| URL | The URL of the WordPress installation. |
| Authentication Type | Choose between “HTTP Authentication” and “OAuth 1.0”. |
| Login | WordPress login (only for HTTP Authentication). |
| Password | WordPress password (only for HTTP Authentication). |
| Client Key | Client Key for WordPress (only for OAuth 1.0). |
| Client Secret | Client Secret for WordPress (only for OAuth 1.0). |
| Token | Token for WordPress (only for OAuth 1.0). |
| Token Secret | Token Secret for WordPress (only for OAuth 1.0). |
3. Permissions
By default, the plugin is disabled for all users except the root user.
To grant access to specific users or groups, you must assign them the system right “Allow WordPress Export.”
This can be done in the User/Group Editor under the tab:
System Rights → Plugins
Usage
After successful installation and configuration, authorized users can create a WordPress transport via the exporter.
To transfer selected images to WordPress:
- Select the desired records in the search view.
- Right-click on a record and choose “Export”.
- Define which image versions should be used.
- Click the truck icon in the lower-right corner.
- In the transport dialog:
- Add a new transport.
- Set the type to “WordPress”.
- Under “Options”, choose your desired WordPress installation.
- Click “Apply” and then “Export” to send the files to WordPress.
Once exported, you can access and use the images directly from the media gallery in your WordPress site.
Note:
- Currently, only images are supported.
- Deleting files from WordPress via this plugin is not supported at this time.